I’m constantly asked, “How do you get your images so sharp on Facebook?” BUT the real question is, “How do I minimize Facebook’s image compression?”
Well… there’s a Photoshop Action for that, and you can download it here: Free Photoshop Actions. My Exact Dimension Resize and Sharpen action is one of the 12 actions included in our free action set, This action properly converts your image from a high-res photo to an optimized web file, and is perfect for any social media platform.

Facebook allows for a maximum image size of 2048px on the longest size, but still claims that the optimal size for posting is 960px. Within the past few months, Facebook has made changes to their compression algorithm, and I noticed these dimensions were not working for me anymore.
After much trial and error, these are the dimensions that I now use:
- Landscape images – 2000px (longest side)
- Portrait images – 1600px (longest side)
When you run the Exact Dimension Resize & Sharpen action, your high-res image will be duplicated, converted to low-res and resized to the dimensions you specified. You will also see that a Web Sharpen layer has been created above the Background layer in the Layers Palette. The Web Sharpen layer opacity defaults to 50%. To ensure your image is not over-sharpened you will need to reduce the layer opacity.
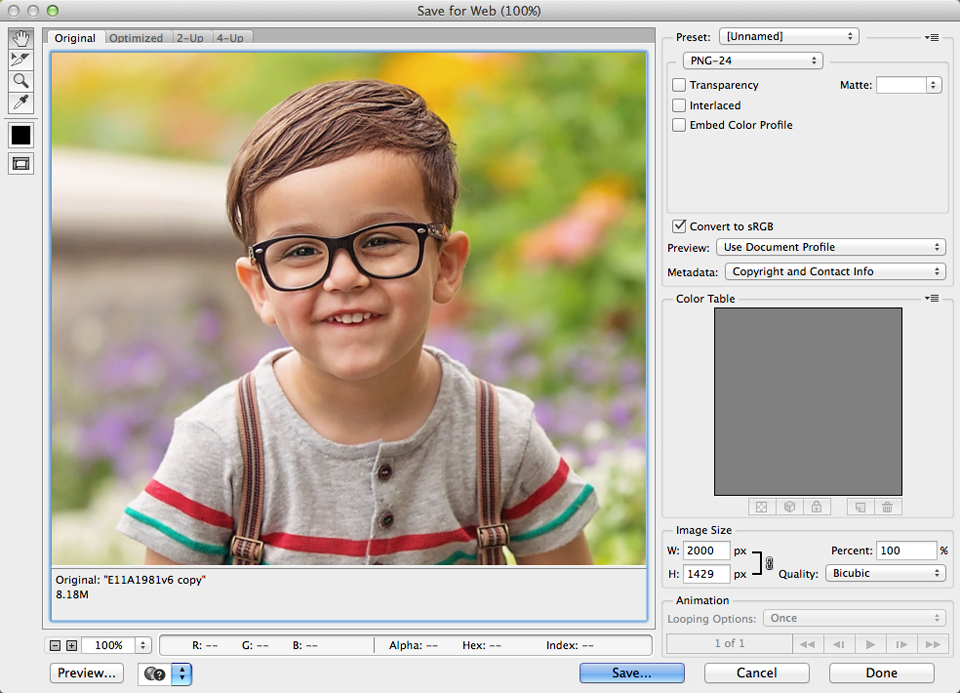
When you’re ready to save your image, go to File > Save for Web. Most people save their web images a JPEGs, but I personally achieve better results on Facebook by saving my images as PNG files (PNG-24 to be exact). Below is an example:

By no means am I saying that this is the only way to do this, or even the correct way; this is just my way. I have had success using these new dimensions, but I have a feeling that Facebook compression will change again in the future and I will need to update this post.
Browse our lightroom presets and our photoshop actions.
Sign up for your free Photographer.org profile where consumers searching for photographers can find photographers near me.
Here are some additional free lightroom presets at www.freelightroompresets.org/free-lightroom-presets/

Great advice. I didn’t know that you can post PNG files to Facebook. Will do this going forward. Thankfully you have the action also in your action packs 🙂
I have the newborn collection and the innocence collection. Is this free action the same as the one in the newborn collection?
Yes, the resize action is the same.
I am so excited to learn this!!! thank you thank you for sharing~
Totally spaced about saving it to the WEB format and that I can upload using PNG files!! Thank you for sharing! Your actions are my absolute favorite! There are a ton of awesome people out there who make some amazing actions but yours are still the best!! Plus I like that you are willing to help others out . Makes a huge difference and definitely makes me a faithful customer. For me there is a difference between people with amazing talent and people with amazing talent who appreciate their followers/fans and are willing to help those who are inspired by the artists works. It’s like finding a doctor who is a great doctor by knowing their stuff and helping you out medically and finding a great doctor who not only knows what they are doing but also treats you more then “just” a patient. So glad to have found your work and be a member of your new group! ( Also am a FB fan but have been for a long time!)
This is great info! The only question I have is, how do add my logo to the png file when saving in PS? I usually export from LR and save it as a jpeg, with my watermarked logo. Do you know how to do this in PS in one step? Thanks!
THANK YOU! Would this blog post apply to timeline pictures as well??? My timeline picture is so blurry and I can’t figure out what to do! But yours looks great!
When I run the action and the Image Size box opens and i resize as per your instructions
Landscape images – 2000px (longest side)
Portrait images – 1600px (longest side)
the Resolution is 300. Do i need to change this. or leave it at 300.
Also regarding .png files, I thought they only work on FB business pages. Can they now be uploaded to FB personal pages
Yes, .PNG files work on personal as well. As for the resolution, leave it at 300 because the action will later optimize it for web resolution.
Awesome info! I knew that FB was doing something new, and I’m grateful for the actions! Just wanted to let you know that it was wicked smart to put “2015” in the title of this post because when googling it, its hard to find up to date info, and I clicked on yours right away, knowing it was the latest! Thanks again!
Unfortunately, I’m running into more than just a poor Facebook quality upload. I use Lightroom for my editing, which doesn’t have an option to save as a PNG. So I right click the photo and choose to edit it in Photoshop and the quality from that transition changes for the worse. When I bring the photo over to photoshop to edit, it looks as crappy as it does when I upload to Facebook.
Generally, I do a lot of landscape photos, but I’m trying to edit photos I took of my son. So I’m not sure where this problem is stemming from! I’m about to pull out my hair over this. Any suggestions?
Hi Molly. Lightroom uses a color space called ProPhoto, and it ends up looking really bad if you use that color space when uploading to Facebook. When you bring your photos into Photoshop, I would immediately convert them to sRGB and see if that fixes the issue.
Hello, love your actions! I purchased them about a year ago and do use your Facebook action, wondering if I need to purchase the new one with the new dimensions since it has been a little over a year?
Does the set you purchased have the ‘Exact Dimension Resize & Sharpen’ action in it? That is the one I use most of the time because I can choose what size I want my image to be.
I just tried PNG and it is definitely sharper than jpg. Thanks so much. Have to join your group maybe it will take the frustration out of posting to my business pages. Thanks so much!
This may be a dumb question but when you send the final pictures to your client and they are planning on printing basic 4×6 to 8×10 prints, would you save it as JPEG or PNG and would you use the Sharpen for print for sending to them or the Exact Dimension Resize and Sharpen action?
Hi. I would save it as a JPEG, and only use Sharpen for Print. The other option is a web resize tool that lowers the image resolution for optimal web use.